The reliable way to scale up a drawing or photo to a big canvas or wall is the grid method. Draw a grid over your small reference, draw a larger grid with the same number of squares on the surface, and copy the image one square at a time. The proportions scale up exactly, because each cell only grows in size, never in count. Match the aspect ratio first, snap the big grid with a chalk line, and work light. Here is the full method, the scaling math, and the alternatives.
Scale up a drawing with the grid method
The grid method enlarges a drawing by dividing the small reference and the large surface into the same number of squares, then copying the contents square by square. You draw a grid over the reference. You draw a proportionally larger grid, with the identical number of rows and columns, on the canvas or wall. Then you fill each large square with what you see in the matching small one.
This is the classic squaring-up technique, used for centuries to move a small study onto a large finished work. Italian and Flemish painters squared up their studies. Egyptian workshops used proportional grids to standardise figures across enormous walls, a canon of proportions built on a system of horizontal units. Albrecht Dürer documented a gridded perspective device in 1525, a frame strung so the artist could transfer what appeared in each cell onto a corresponding grid on paper. The tool in your hand has changed. The idea has not.
It works so well for enlargement because of how your eye reads a bounded square. On a blank two metre canvas, placing a single curve correctly is nearly impossible. Inside one small square, the same curve becomes trivial: you only judge where the line enters the square and where it leaves. The hard problem of the whole image becomes a hundred easy problems, and each one is solved by looking at a single cell.
Why the grid scales without distortion
The grid preserves proportion because the number of cells stays fixed while only their size changes. A 4 by 5 grid on a postcard and a 4 by 5 grid on a wall describe the same relationships. Square B3 sits in the same relative position on both. A contour that crosses the midpoint of the left edge of B3 on your reference crosses the midpoint of the left edge of B3 on your wall. Those crossing points are your accuracy checkpoints, and they line up at any size.
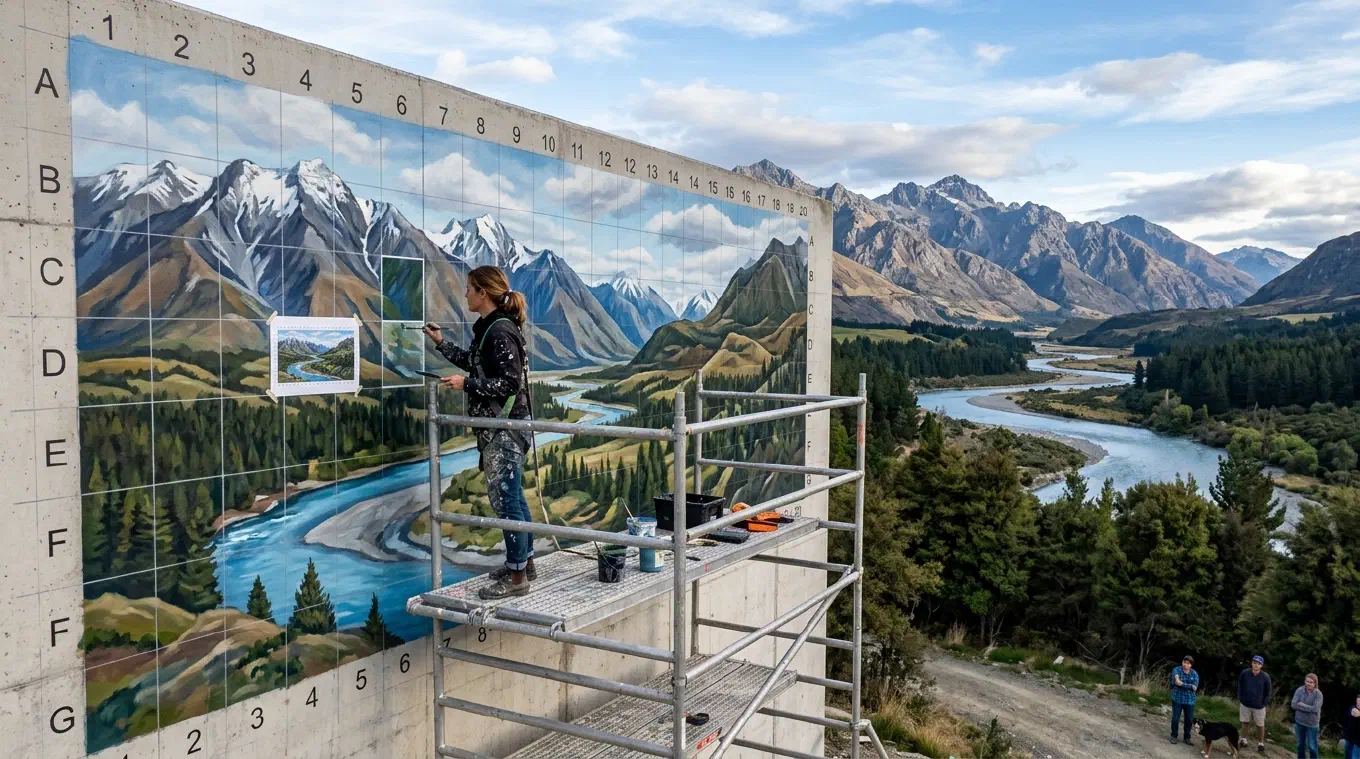
This is why the method scales linearly. Transferring a 10 cm sketch to a 3 metre wall is the same process as copying it at the same size, only each square is larger. If it works at twice the size, it works at twenty times the size. Muralists have used this to carry small drawings onto surfaces several stories tall.
The scaling math, with a real example
The scale factor equals the size of one square on your surface divided by the size of the matching square on your reference. That single number tells you how much larger everything gets.
Say you are enlarging a reference onto a canvas 120 cm wide, and you want 10 cm squares on the canvas. Twelve columns of 10 cm fill the 120 cm width. Your reference, gridded with the same twelve columns, might have squares of 2 cm each, so the reference is 24 cm wide. The scale factor is 10 cm divided by 2 cm, which is 5. Every shape is enlarged five times, and every point inside a reference square lands at the same relative position in the larger square.
For a wall, the arithmetic is the same in bigger units. A 3 by 3 metre wall gridded 3 by 3 gives squares 1 metre apart. More cells give you more control on a detailed image, fewer cells are faster to snap and copy. The one rule you cannot break: the reference and the surface must share the same aspect ratio, or the image stretches. Crop the reference to the surface proportions before you draw a single line.
Step by step, from small reference to big surface
1. Match the aspect ratio first
This is the step beginners skip, and it causes almost every distorted result. Your reference and your surface must have the same width-to-height ratio before you grid either one. Crop the reference to match the canvas or wall. A photo cropped to 2 by 3 goes onto a 2 by 3 canvas, never onto a 4 by 5. Get this right first and the rest is mechanical.
2. Grid the reference
Divide the reference into equal squares. Choose the count by complexity: a simple silhouette needs few squares, a detailed portrait needs many. Equal squares are easier to read than rectangles. On a printed photo you rule the lines by hand. Digitally, Overgrid overlays an adjustable grid on any reference in seconds, so you can change the row and column count freely until it fits the subject, with nothing to redraw.
3. Snap the big grid on the surface
Replicate the same number of rows and columns on the canvas or wall, at the larger square size your scale factor gives you. On a canvas, a long straight edge and a light hand are enough. On a wall, snap the lines with a chalk line and keep them true with a level or a laser level, because a grid that drifts out of square drags the whole image with it. Number the rows and columns so you always know which cell you are in on a large surface.
4. Copy one square at a time
Work square by square, not object by object. You are not drawing an eye or a window. You are drawing a curve that enters the left edge a third of the way down and exits the bottom near the centre. Read the shape, its position against the grid lines, and the points where it crosses each edge. Let curves stay curves. The grid lines are reference points, not a straightedge to snap your lines onto.
5. Work light and step back
Draw the grid and the transfer lightly, in vine charcoal, a hard pencil, or erasable chalk, so the lines vanish under the first layer of paint or wipe away cleanly. Step back often. The grid guarantees each square is right, but only your eye, from a distance, catches drift across the whole image before you commit paint.
The alternatives, and when each wins
The grid is not the only way to enlarge, and honesty means naming where the others beat it.
Projector
A projector beams your reference straight onto the surface so you trace the main shapes. It is the fastest method for very large work, and it descends from a long optical lineage: the camera obscura was used as an aid for drawing and painting from the second half of the 16th century onward. The cost is real. You need a dark room, the gear, and a projector positioned square to the wall. Tilt it off axis and the image keystones into a trapezoid, distorting everything you trace. It also trains your eye very little, because you are copying a projection rather than reading shapes. Reach for a projector on a large mural when you have a dark space and speed matters more than accuracy or skill.
Pounce and cartoon transfer
Pouncing transfers a full-size drawing by pricking holes along its lines, then dabbing charcoal or powder through the holes to leave a dotted outline on the surface below. Renaissance workshops made full-size preparatory drawings called cartoons and transferred them to walls this way, and the technique of pouncing survives on old drawings as rows of pricked marks. It gives a clean, exact transfer with no scaling math. The catch is that it needs a drawing already at full final size, so you still have to solve the enlargement some other way first, usually with a grid or a projector, before you can pounce.
The grid wins where those two fall short. It needs no gear, no dark room, and no full-size drawing prepared in advance. It preserves proportion by construction, and it keeps your eye working the entire time. That is why it survives every change in technology around it. For the full history and the finer technique, read the complete guide to the grid method, and if you want the tools that do this on a phone or tablet, see how to transfer a photo to canvas.
Where Overgrid fits
Overgrid puts a precision grid on any reference photo, on your phone, tablet, or computer, so you skip the slow by-hand ruling step and get an accurate grid you can change freely. It grids and plans the reference. It does not draw the grid on your physical wall for you. That part is still your chalk line and your level. What it removes is the guesswork on the reference side and, above all, the scaling math.
That math lives in Canvas size mode. Instead of guessing a square count, you enter your canvas width and the size you want each square to be, in centimetres or inches. Overgrid reads your reference’s proportions and works out the height, the number of rows, and the number of columns that fit. You plan the grid in the real measurements of your actual surface, and the enlargement is calculated for you. You can still grid by plain rows and columns whenever you prefer that, which is always free.
Around that sit the features that make an enlargement go right: crop to your target aspect ratio so the reference and surface match, an adaptive contrast grid that stays visible whether the photo is a bright sky or a dark forest, diagonals and numbering to keep you oriented on a large canvas, saveable presets, a value study that reduces the reference to a few tonal levels so you plan light and shadow before you paint, and full-resolution export up to 4096 pixels to prop next to your easel.
Overgrid is free to download and use. The free version is a working tool: the basic grid overlay, preset colours, export up to 1024 pixels, and up to three projects. Premium is a one-time purchase, never a subscription, and it unlocks Canvas size mode, unlimited projects, custom colours, adaptive contrast, value studies, temperature overlays, presets, and 4096 pixel export. Everything stays on your device, with no account and no cloud upload. It runs on iPhone, iPad, and Mac and on Android, and one purchase unlocks premium across every device on the same store account.
Who this is for
If you have a small sketch, study, or photo and need it accurately on a large canvas or a wall, the grid method is the tool. It costs nothing, needs no dark room, scales to any size, and keeps your proportions honest while you keep your eye sharp. Painters and muralists have relied on it for millennia for exactly this reason. The one weakness, the slow setup and the scaling arithmetic, is what Overgrid removes. Grid the reference, let Canvas size mode do the math, snap your big grid, and paint what you see.